Having trouble with spongy brakes? You’re not alone. Reverse bleeding technique for brakes can fix that. This article will walk you through how to reverse bleed brakes, making your ride safer.
Ready to learn something new?
Table of Contents
ToggleWhat is Reverse Brake Bleeding?
Reverse brake bleeding is a way to push brake fluid into your car’s braking system from the bottom up. It’s different because most times, you send fluid top-down. This method comes in handy as it makes sure all air escapes from the calipers or drum brakes back to the master cylinder where you can easily get rid of it.
How Reverse Bleeding Differs from Traditional Bleeding
Reverse bleeding and traditional bleeding are two ways to get air out of your car’s brake lines, but they work in opposite directions. In the usual way, you push fluid from the master cylinder down to each wheel.
This can be tricky because air wants to go up, not down. With reverse bleeding, you flip this process on its head. You pump brake fluid in at the wheel and let it travel back up to the master cylinder.
This method uses gravity’s help since air bubbles naturally rise. So, it can be more effective at removing stubborn air pockets.
Flip the script on brake maintenance with reverse bleeding—let gravity do the heavy lifting.
Think of pouring a soda upside down; that’s kind of what reverse bleeding does for your brakes – it makes sure those pesky air bubbles go where we want them to: out of your braking system! By doing this, it helps make your pedal feel firm again fast and ensures better safety when you hit the road.
Traditional ways might miss some bubbles or take longer because fighting gravity is tougher than working with it.
Benefits of Reverse Bleeding for Brake Systems
Reverse bleeding for brake systems is a game changer. It pushes air up and out the master cylinder, making sure your brakes respond fast. This method works better because air naturally wants to go up.
Your pedal feels firmer after this, giving you more control when driving.
I tried reverse bleeding on my old car that always had soft brakes, even after traditional bleeds. The difference was night and day. For anyone doing DIY brakes at home, getting a reverse brake bleeder kit is key.
You’ll need the right brake fluid too. This way ensures every bit of air gets out of your hydraulic brake system without multiple tries. Plus, it’s safer since good brakes mean safer stops.
Tools and Equipment Needed for Reverse Brake Bleeding
For reverse brake bleeding, you’ll want a special kit and the right fluid. Gear up with safety stuff like gloves and goggles, too.
Reverse Brake Bleeder Kit
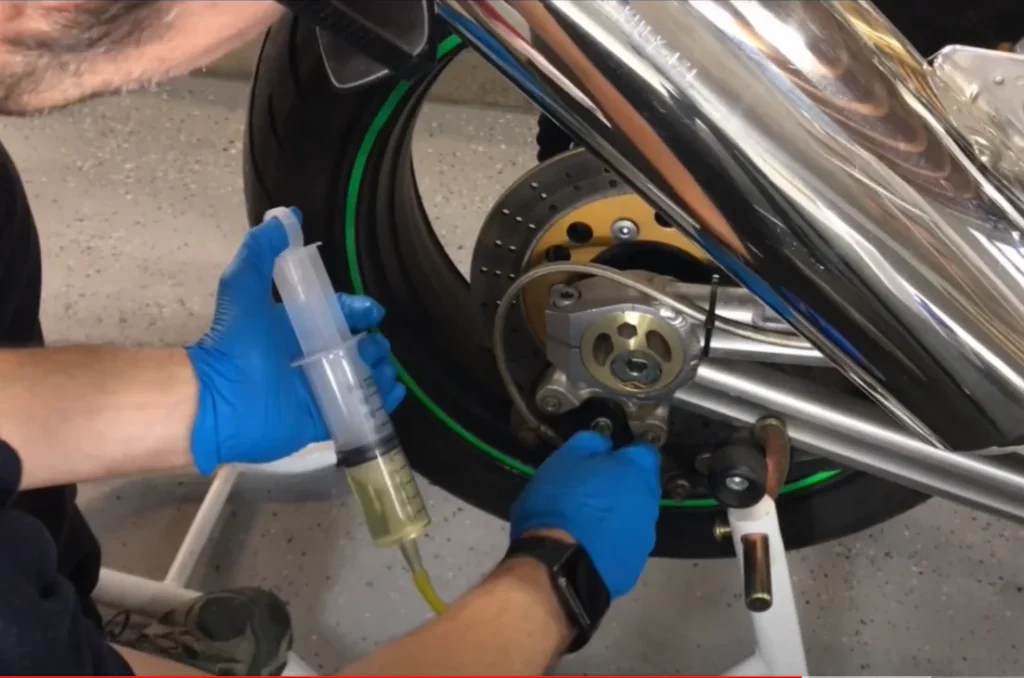
A reverse brake bleeder kit is a must for your garage if you’re into doing your own car maintenance. This tool pushes brake fluid from the bottom of the system upwards, clearing out air bubbles along the way.
I’ve used one myself when fixing up my old truck, and it was a game-changer. No more pumping the pedal like crazy or needing an extra set of hands!
This kit usually includes a pump, tubes that fit snugly onto your vehicle’s caliper valves, and often a container to catch old fluid. Using this setup makes reverse bleeding brakes easier and faster than traditional methods.
Plus, it works wonders on hydraulic systems in cars and motorcycles alike. After switching to reverse bleeding with this kit, I noticed my brakes felt firmer and more responsive – talk about peace of mind when driving!
Compatible Brake Fluid
Choosing the right brake fluid is key for your vehicle’s safety and brake system performance. There are different types of fluids, like DOT 3, DOT 4, and DOT 5. Each type works best with certain systems.
For example, if your car uses a hydraulic brake system, you’ll find DOT 3 or DOT 4 is often recommended because they handle high temperatures well without boiling too fast.
Make sure to check your vehicle’s manual to see which fluid it needs. Using the wrong one can mess up how your brakes work or even damage the system. It’s like putting diesel fuel in a gas engine – not a good idea at all! Always use fresh fluid from a sealed container to avoid moisture and dirt getting into your brakes.
This simple step keeps you safe on the road and makes sure those reverse bleeding efforts aren’t wasted.
Safety Gear and Precautions
Wear the right gear before you start reverse brake bleeding. You need gloves to protect your hands from brake fluid. This fluid is harsh and can harm your skin. Also, put on safety glasses to shield your eyes.
Brake fluid splashes are no joke, and eye protection is key. Make sure to work in a well-ventilated area too. Brake fluid fumes aren’t good to breathe in.
Keep your workspace clean and organized. Tools like the reverse brake bleeder kit should be at hand but not in your way. Check that all equipment works well before you begin. Avoid spills by carefully opening the brake fluid bottle over a catch pan or some rags.
If you spill any, clean it up fast to keep your space safe and tidy.
Step-by-Step Guide to Reverse Bleeding Brakes
If you’re looking to get your brakes working like new, reverse bleeding them is a savvy move. This guide walks you through the process with ease, showing you how to push brake fluid from the ground up, ensuring air bubbles don’t stand a chance.
You’ll need a few things like a reverse bleeder tool and some fresh brake liquid before rolling up your sleeves. Once everything’s set, it’s all about connecting that tool to each wheel stopper’s bleeder nozzle one by one and letting the fluid do its magic until those pesky air pockets are gone for good.
Preparing the Vehicle for Reverse Bleeding
First, ensure your car is stationed on a level ground and the engine is off. This strategy enhances safety during the process. Wear safety glasses and gloves to safeguard your skin and eyes from the corrosive brake fluid.
Have a reverse brake bleeder kit at hand for this task.
Following that, locate the master cylinder — typically, it’s positioned near the firewall on the driver’s side in the engine compartment. Clean the area surrounding the master cylinder cap to avoid contamination of the brake system.
Load it with new, compatible brake fluid till the full mark but abstain from overfilling. Keeping impurities away is essential for smooth braking.
Rushing through these initial steps can result in a system plagued with more air than before! Starting off clean can significantly improve the outcome.
The ideal approach to reverse bleeding brakes? A pristine system replenished with fresh fluid.
Setting Up the Reverse Bleeder Tool
Getting your reverse bleeder kit ready is like prepping for a small adventure in automotive repair. You grab the kit, making sure it has all its parts: the pump, tubing, and adapters that fit your vehicle’s brake fluid reservoir and slave cylinder.
Check if the brake fluid you have matches what your car needs. Safety gear is a must here; put on gloves and goggles to keep yourself safe from any splashes.
Next step, connect one end of the tube to the bleeder valve on the caliper or wheel cylinder farthest from the master cylinder. The other end hooks up to your bleeder tool. Make sure every connection is tight so no air sneaks in.
Pour clean brake fluid into the reverse bleeder tool following instructions; this helps avoid introducing air into the system during bleeding – kind of like making sure there’s enough water in a water gun before starting a water fight!
Bleeding Each Brake Line in Reverse Order
Start with the brake furthest from the master cylinder, usually at the back of your car. This might feel a bit backward if you’re used to traditional bleeding methods. Think of it as feeding brake fluid up a straw from the bottom rather than pouring it down from the top.
You’ll use your reverse brake bleeder kit here. Attach its hose to the bleed screw on the caliper and make sure everything’s snug and leak-free.
Pump brake fluid into each line until you see it bubble free into your catch container linked to the master cylinder. I once made a mess by not checking my connections – learn from my mistake! Keep an eye on that fluid level in both your tool and reservoir; running dry can mean starting over or sucking air back into lines you’ve just bled.
After nudging out all those stubborn air bubbles, move onto the next wheel, repeating these steps until every line sings clear of air pockets.
Checking for Air Bubbles and Proper Fluid Flow
Check each brake line for bubbles. You’ll look through a clear tube attached to the bleeder valve on your disc brakes or drum brakes. Pump the brake lever slowly. Air bubbles moving through this tube show that there’s still air in your hydraulic brake systems.
Keep going until you see only brake fluid flowing smoothly with no bubbles.
Once, I thought my bike was ready after a quick bleed. Halfway down a steep hill, my brake pedal felt mushy—classic sign of air trapped inside. Lesson learned: patience pays off big time in reverse bleeding brakes for vehicle safety and reliable stopping power.
Air out, good times in; that’s the golden rule of reverse bleeding.
Common Mistakes to Avoid During Reverse Bleeding
Jumping into reverse bleeding your brakes without watching out for common slip-ups can lead to more headaches than you signed up for. Pushing the brake system too hard or mixing up the order could land you back at square one, scratching your head as to why those brakes still feel mushy.
Over-Pressurizing the Brake System
Putting too much pressure on the brake system is like blowing up a balloon too much. It might pop! When you’re working on reverse brake bleeding, keep an eye on how hard you push the fluid in.
If you push too hard, parts of your car’s brakes could break or get damaged. This includes things like the rubber seals inside calipers and bleeder valves. These parts are meant to hold brake fluid under certain conditions, not a ton of it all at once.
Use tools that let you control the pressure easily. Always check the recommended settings for your car’s make and model. Going over these settings can cause leaks or other damage, meaning more work and money to fix it later.
Take your time and be gentle with each step during reverse brake bleeding to avoid this mistake.
Skipping the Proper Bleeding Sequence
Skipping the right bleeding sequence can mess up your brake maintenance. It’s like trying to run before you walk. Each brake line must be bled in a certain order, usually starting from the wheel farthest from the master cylinder and moving closer.
If you mix up this order, air bubbles might stay trapped in some parts of the system.
You want your brakes working smoothly? Make sure to follow the step-by-step guide carefully. Skipping steps or going out of order is a shortcut that leads nowhere good. It could mean more work later or even less safe brakes.
Stick to the plan for top-notch results and safer driving on every road trip or commute.
Allowing Contaminants into the System
Keeping your brake system clean is key. Dirty tools or fluid can mess things up. Imagine pouring fresh brake fluid through a dirty funnel. That’s like inviting dirt to a party where it doesn’t belong.
Each bit of grit in the fluid can harm your brakes, making them less safe.
Use only clean equipment and new brake fluid for reverse bleeding. Old containers might look fine but could harbor hidden contaminants. Think of when you reuse a water bottle without washing it – not the best idea, right? It’s similar with brake bleeding methods; cleanliness ensures everything works as expected, keeping you safer on the road.
Troubleshooting Reverse Bleeding Issues
Hit a snag with reverse bleeding? No worries. Sometimes air might still hang out in the lines, or you find it tough to keep the pressure right. Maybe your brake pedal feels mushy even after you did everything by the book.
Let’s tackle these hiccups together, keeping your ride safe and your brakes sharp.
Air Still Present in the Lines After Bleeding
You just finished reverse bleeding your brakes, but you notice the brake pedal still feels spongy. This usually means air is still hanging out in the lines. It’s a common snag even when you follow all the right steps for reverse brake bleeding.
I ran into this issue last time I worked on my car. Despite being careful, I had to go through the process again.
The trick is to check each brake line closely. Make sure no air bubbles are floating up through the brake fluid. Sometimes, it takes more than one try to get all that sneaky air out.
Use your reverse bleeder tool and keep an eye on those connectors at each caliper – they might be where air is slipping in unnoticed.
Difficulty in Maintaining Proper Pressure
Keeping the right pressure during reverse brake bleeding can be tricky. If the pressure is too low, air won’t push out of the system. Too high, and you might damage your brakes. Think about using a reverse brake bleeder kit correctly.
This means setting it up at just the right pressure for your car’s brake system.
You need to check that all connections are tight and leak-free. Even a small air leak in the hose or at the caliper connection can let air back into the system. That defeats your hard work! Use quality hoses and secure them well to avoid this hassle.
Keep an eye on your brake fluid level too; don’t let it get too low while bleeding your brakes to maintain proper pressure throughout the process.
Brake Pedal Still Feels Soft After Bleeding
You just finished reverse bleeding your brakes, but the pedal still feels soft. This might happen if air is trapped in the brake lines or calipers. Air in the system stops your brakes from working right because it compresses, unlike brake fluid.
To fix this, check each bleeder screw on every caliper to make sure they’re tight and no air can get in. Sometimes, you need to bleed your brakes more than once to get all the air out.
Make sure you use the right type of brake fluid for your car too. Using the wrong kind can mess with how your brakes feel and work. If problems keep up after checking everything, there might be a leak somewhere or an issue with your master cylinder.
Leaks let air back into the system and drop pressure, making that soft pedal come back. Look around each wheel and along brake lines for signs of leaking fluid as a clue something’s not right.
Conclusion
Reverse bleeding brakes might sound tricky, but it’s a smart way to keep your brakes feeling sharp. This method pushes air up and out the right way, using fluid dynamics on your side.
Grab that reverse bleeder kit and make sure you’ve got the right brake liquid. Wear safety gear to protect yourself. Follow each step carefully to avoid common slip-ups like letting dirt in or messing up the bleed order.
If things don’t seem right afterward, check for lingering air or soft pedal issues again. Mastering reverse bleeding can take a bit of practice, but once you get it down, your brakes will thank you every time you hit the road.
FAQs
What are the benefits of reverse brake bleeding compared to standard bleeding?
Reverse brake bleeding has many advantages over standard bleeding. It uses the laws of brake fluid dynamics to push air up and out of your system, which is a more natural path for air bubbles. This method can result in better brake maintenance techniques and improved performance.
Can you provide a step-by-step guide on how to reverse bleed brakes?
Sure thing! First, gather your tools – you’ll need a bleeder valve and some fresh brake fluid. Next, locate the caliper at the bottom part of your wheel assembly and attach the bleeder valve there. Then, pump new fluid into the system through this valve until it starts coming out clean at the top reservoir.
How does reverse bleeding impact different parts like clutch or callipers?
The process not only impacts your brakes but also other components like clutch systems that use hydraulic pressure too! For instance, when it comes to calipers, they often benefit from being thoroughly cleaned by this method as well.
What are some recommended tools for performing a reverse bleed on my brakes?
Some must-have items include quality wrenches that fit your car’s specific bleeder valves perfectly along with syringes or pumps capable of pushing fluids against gravity – these will make sure all those pesky air bubbles get ousted!


